Install from Snowflake Marketplace
The Data Product Studio installs as a Snowflake Native App from Snowflake Marketplace. This article walks a Snowflake admin through the install.
Applies to: Snowflake admin Detail level: Standard
Who this is for
You’re a Snowflake admin doing a one-time install of the Data Product Studio in your account. After install, your data team uses the studio through its own UI; you don’t need to use it day-to-day.
Before you start
You’ll need:
- A Snowflake account with permissions to install Native Apps.
ACCOUNTADMINis the typical role. - The ability to approve the account-level privileges the install requires. These are listed in the steps below.
You should have already read:
- What is the Data Product Studio
Steps
-
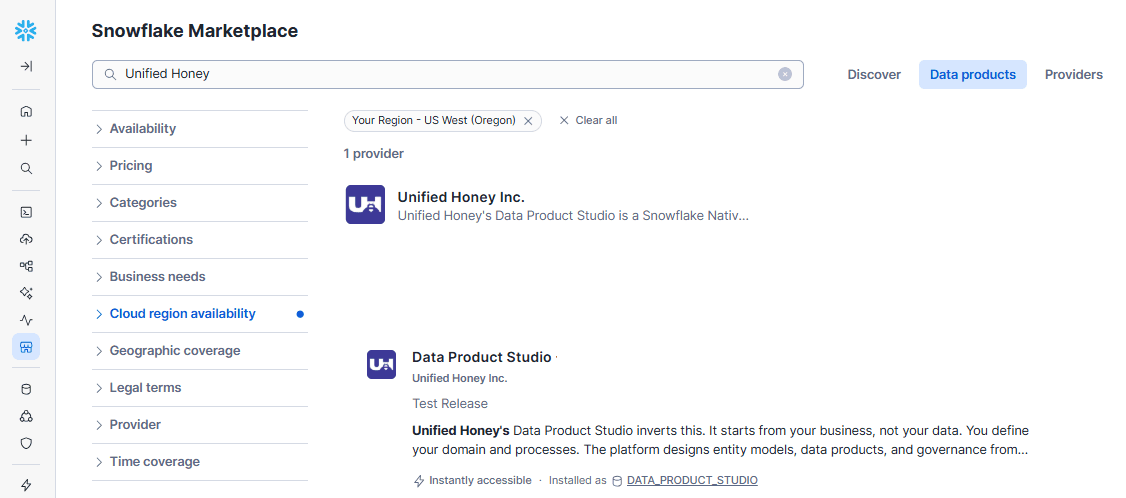
Open Snowflake Marketplace and search for Data Product Studio. The listing is provided by Unified Honey Inc.
-
Open the Data Product Studio listing.
-
Click Get in the top right.
-
In the Get dialog, confirm the Application name. The default is
Data_Product_Studio. You can change it, but the default is fine for most accounts. Note the name you choose; you’ll need it later when granting source data access.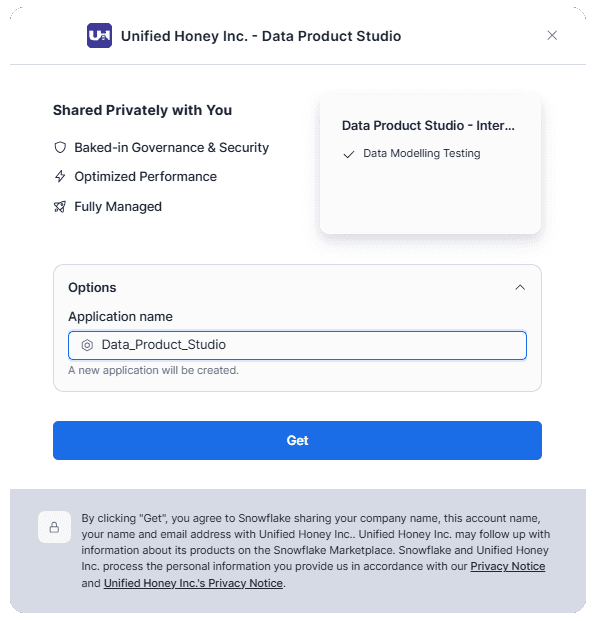
-
Click Get at the bottom of the dialog. Snowflake installs the app. This takes a minute or two.
-
When the Successfully Installed dialog appears, click Configure. Snowflake opens the Account privileges wizard for the app.
-
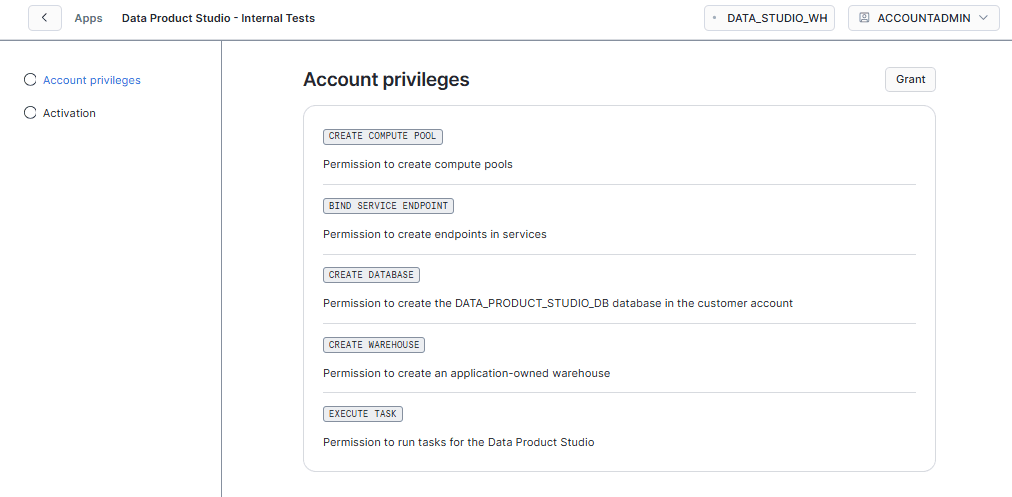
In the Account privileges wizard, click Grant on each of the five privileges:
- CREATE COMPUTE POOL: lets the app create the compute pool it runs on.
- BIND SERVICE ENDPOINT: lets the app create endpoints in its services.
- CREATE DATABASE: lets the app create its internal
DATA_PRODUCT_STUDIO_DBdatabase. - EXECUTE TASK: lets the app run the streams and tasks that drive its workflow.
- CREATE WAREHOUSE: lets the app create the application-owned warehouse
DATA_STUDIO_WH.
-
Once all five privileges show Granted, click Next to continue to the Activation step.
-
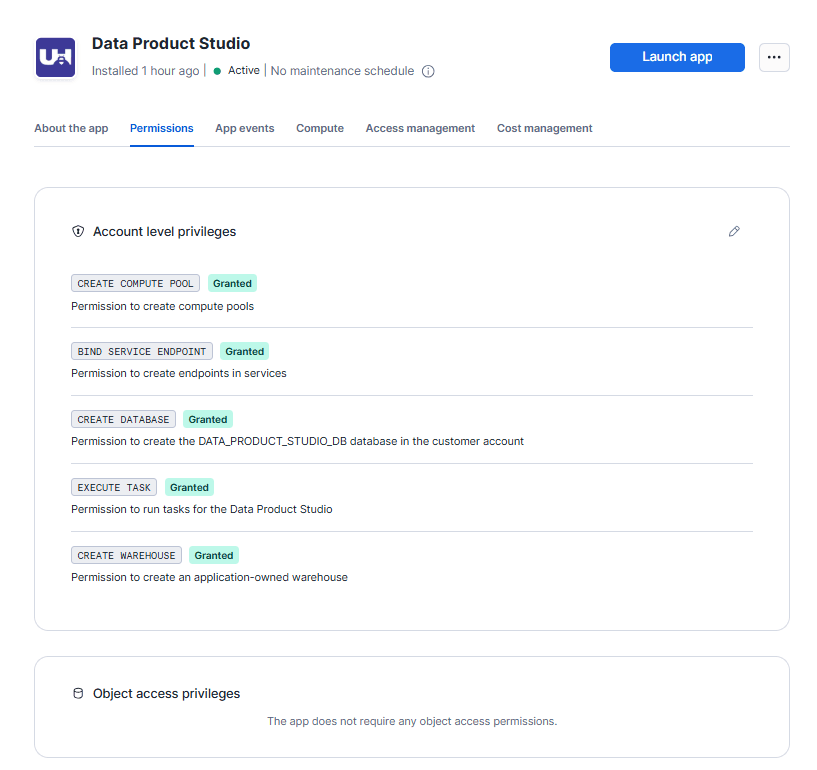
After activation completes, the app’s installed page opens. Click Launch app to open the studio.
What happens next
The install creates the application object, the DATA_PRODUCT_STUDIO_DB internal database, the DATA_STUDIO_WH warehouse (X-Small, 1-minute auto-suspend), and the DATA_PRODUCT_STUDIO_APP_POOL compute pool. Launch app opens Data Product Studio Home.
The app is installed but two things still need granting before it can do anything useful:
- Cortex access. The app uses Cortex AI functions for entity and metric generation. Cortex isn’t granted by the install.
- Source data access. The app can’t yet read any of your source databases.
The app surfaces both as in-app prompts when you launch it for the first time. See Set up roles for the studio.
Troubleshooting
The “Get” button is greyed out, or shows a permission error
Likely cause: your current role doesn’t have permission to install Native Apps in this account.
Resolution: switch to ACCOUNTADMIN, or ask an account admin to run the install on your behalf. Native App installs require account-level privileges that lower roles don’t have by default.
Before contacting support: capture your current role, the listing URL, and a screenshot of the install dialog.
The Activating screen sits for a long time after I clicked Configure
Likely cause: the compute pool DATA_PRODUCT_STUDIO_APP_POOL is provisioning. Compute pools take a few minutes to start up after install. The Activating screen tells you “This process will take some time, feel free to check back later” because of this.
Resolution: wait a few minutes and reload. If the screen still hasn’t moved, check the compute pool’s status in Snowsight under Admin > Compute Pools. The pool should reach Active before the app becomes usable.
Before contacting support: capture the time of install, the compute pool status, and a screenshot of the Activating screen.
FAQs
Do I need to be ACCOUNTADMIN to install?
Usually yes. The install grants account-level privileges (CREATE WAREHOUSE, CREATE COMPUTE POOL, EXECUTE TASK, and others), and only roles with the right to grant those can approve them. ACCOUNTADMIN is the standard choice. If your account has a custom role with the same grant rights, you can use that instead.
Will the app read my data automatically once installed?
No. The Account privileges wizard grants the app the privileges it needs to run, but not access to any of your data. Cortex access and source data access are granted separately, after install. The app prompts you for both the first time you launch it. See Set up roles for the studio.
Can I uninstall the app?
Yes. In Snowsight, browse to Catalog > Apps, find the Data Product Studio entry, and click Uninstall. The app doesn’t write to your source data, so uninstalling is non-destructive to anything outside the application database. The warehouse DATA_STUDIO_WH and compute pool DATA_PRODUCT_STUDIO_APP_POOL the app created can be dropped separately in Snowsight if you want to clean those up.
Related articles
- Prerequisite: What is the Data Product Studio
- Sibling: Set up roles for the studio
- Next step: Set up roles for the studio
- Troubleshooting: Resolve role and permission errors
Search keywords
install data product studio, snowflake marketplace install, native app install, get data product studio, install unified honey, account-level privileges, CORTEX_USER grant, application database name