Deploy a data product to Snowflake
Deployment turns a published blueprint into real Snowflake objects: storage tables, dimension and fact views, and the relationships between them. This article walks through one full deployment, from clicking Deploy to confirming the objects exist in your account.
Applies to: Domain expert, Data engineer Detail level: Guided
Who this is for
You’ve designed a data product on the canvas, you’ve published it (the blueprint is ready), and now you want to create the actual Snowflake objects. You don’t need to know how to write the SQL the deployment runs; the platform does that.
Before you start
You’ll need:
- A published data product. See Publish a data product.
- The studio’s warehouse (
DATA_STUDIO_WH) running, sized appropriately for your data volume. See Set up warehouses for the studio. - Source data accessible to the application, including any tables referenced in lookups. See Set up roles for the studio.
- Security Roles configured if you want the deployed objects granted to specific roles for downstream use. See the Govern stage articles.
You should have already read:
The deployment flow at a glance
A deployment runs in seven phases:
- Staging. The platform sets up the work area in
DATA_PRODUCT_STUDIO_DB. - Data Processing. The platform reads from your source tables and prepares the data.
- Keys. Business keys are validated and indexed.
- Relationships. Foreign-key relationships between models are created.
- Data. Storage tables are populated.
- Models. Dimension and fact views are created from the storage tables.
- Initial Load. The first load of data into the dimensional structure.
Each phase has logs you can watch in real time. The Model Deployment Summary screen tracks progress.
A typical first deployment of a data product with two or three models takes a few minutes. Larger data products with many models, large source tables, or many lookups take longer.
Steps
1. Open the deployment summary
On the canvas, hover the data product wrapper card. The same toolbar that has the publish icon also has a deploy trigger. Click it.
The Model Deployment Summary screen opens. It shows:
- Total Items, with breakdowns: Staging, Data Processing, Keys, Relationships, Data, Models, Initial Load.
- One row per model in the data product, each labelled with its type (dimension, fact, dimension+fact).
- A Deployment Logs panel on the right.
- Status indicator showing Ready.
- Cancel and Deploy buttons at the bottom.
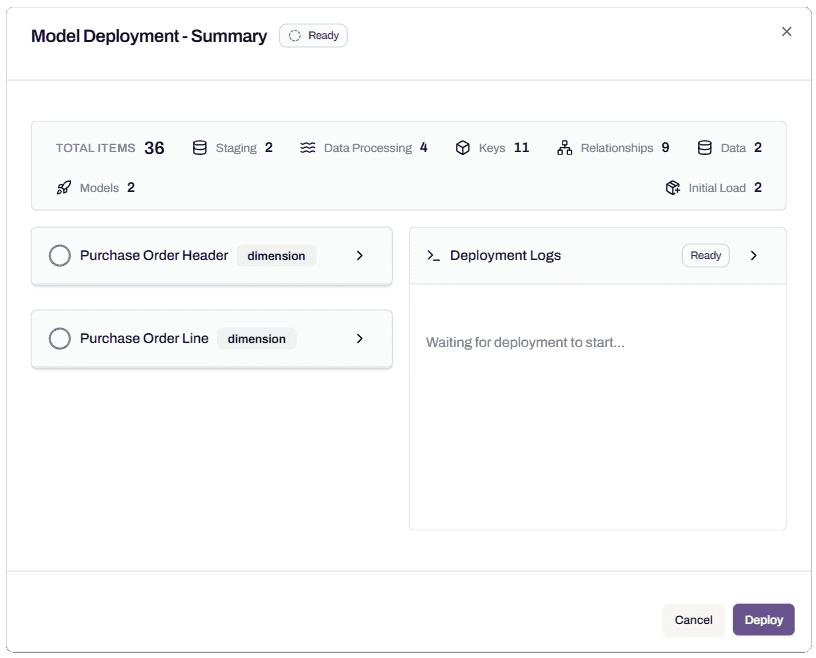
The Ready state means the platform has the published blueprint and the validation has passed. You’re at the point of decision: deploy now, or cancel and review.
2. Review the summary numbers
Before clicking Deploy, look at the breakdown numbers. They tell you what the deployment will create.
- Total Items is the sum of all the operations the deployment will perform.
- Staging counts the staging tables that will be created.
- Data Processing counts the transformations.
- Keys counts the business keys that will be indexed.
- Relationships counts the joins between models.
- Data counts the storage tables.
- Models counts the dimension and fact views.
- Initial Load counts the load operations.
If a number is much higher or lower than expected, this is a chance to cancel and review the design.
3. Click Deploy
When you’re ready, click Deploy at the bottom of the summary.
The status indicator changes from Ready to running. The Deployment Logs panel starts showing log lines as the platform works through the phases.
Each model row updates with a status indicator as the platform finishes processing it.
4. Watch the logs
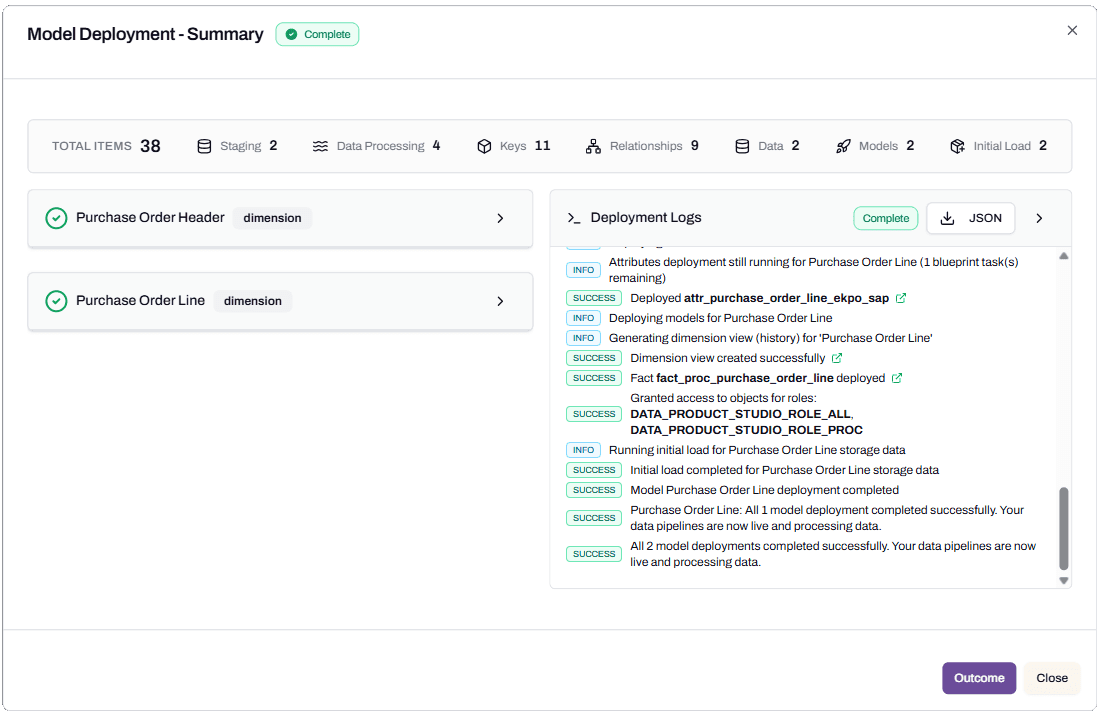
The logs panel shows phase-by-phase progress with INFO and SUCCESS markers:
- INFO lines describe what’s about to happen (“Generating dimension view (history) for ‘Purchase Order Line’”).
- SUCCESS lines confirm completion (“Dimension view created successfully”).
- ERROR lines (if any) flag a problem and stop the deployment.
You can keep the screen open and watch, or close it and come back. The deployment runs in the background and the summary reflects current state when you return.
5. Wait for completion
The status indicator turns to Complete when all phases finish. The bottom-right action button changes to Outcome.
If the deployment fails partway through, the status indicator shows the failure and the logs identify which phase and which model the error came from. See the Troubleshooting section.
6. Review the outcome
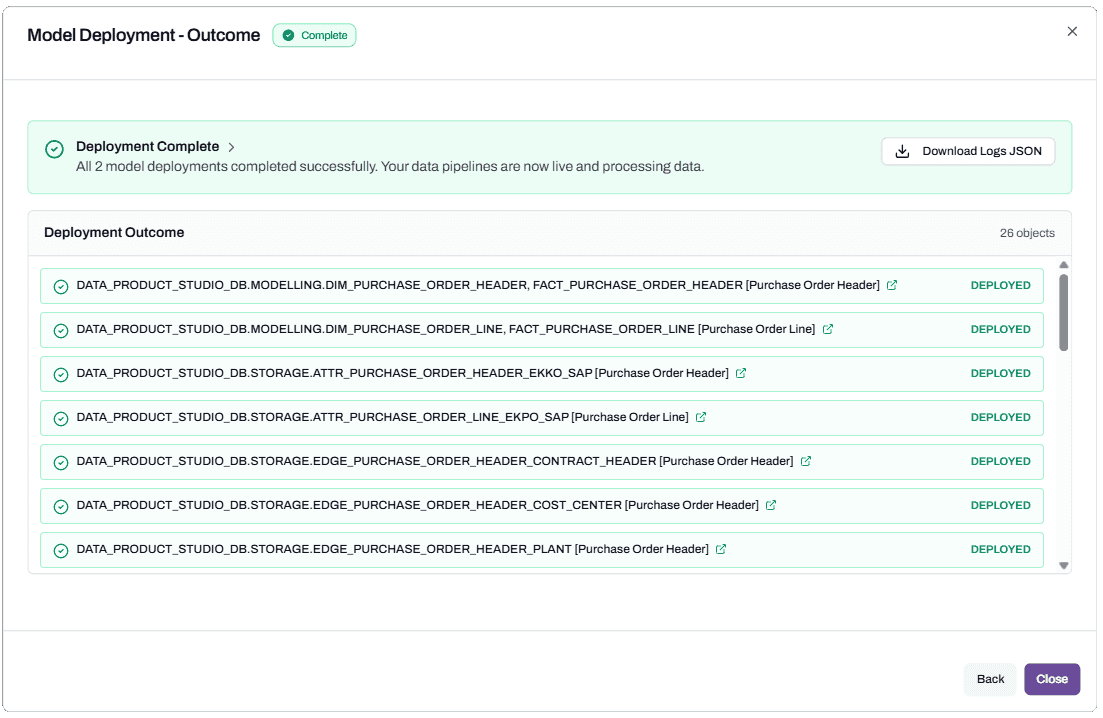
Click Outcome to open the Model Deployment - Outcome screen. It shows:
- A summary banner (“Deployment Complete. All N model deployments completed successfully.”).
- A Download Logs JSON button.
- A list of every Snowflake object the deployment created or updated, each with a status badge (DEPLOYED).
The objects fall into three groups:
- Dimensional models in
DATA_PRODUCT_STUDIO_DB.MODELLING. These are the dimension and fact views that downstream consumers query. Names look likeDIM_PURCHASE_ORDER_HEADERandFACT_PURCHASE_ORDER_HEADER. - Storage tables in
DATA_PRODUCT_STUDIO_DB.STORAGE. These hold the data the dimensional views read from. Names look likeATTR_PURCHASE_ORDER_HEADER_EKKO_SAPfor the loaded source data, andEDGE_PURCHASE_ORDER_HEADER_VENDORfor relationships between models. - Security grants. The deployment grants access to the deployed objects for the security roles configured in Settings > Security Roles. The grants appear in the logs and in the outcome list.
Each object has an open-in-new icon you can click to jump to the object in Snowsight.
7. Confirm the objects in Snowsight
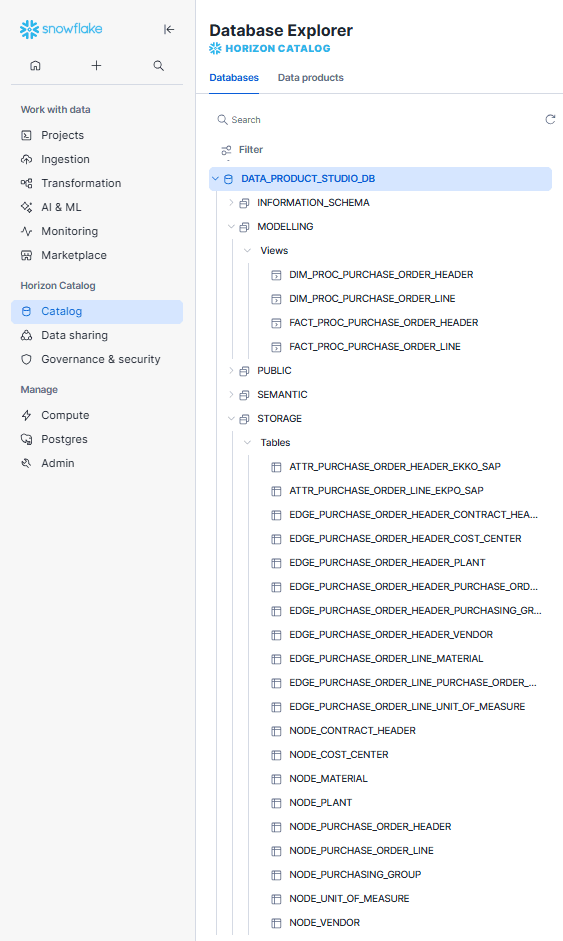
Open Snowsight in another tab. Navigate to Data > Databases > DATA_PRODUCT_STUDIO_DB. You should see:
- A MODELLING schema with your dimensional views.
- A STORAGE schema with the underlying tables.
Run a quick query against one of the dimensional views to confirm data has loaded:
SELECT * FROM DATA_PRODUCT_STUDIO_DB.MODELLING.DIM_PURCHASE_ORDER_HEADER LIMIT 10;If the query returns rows, the deployment is working end-to-end.
What’s deployed and where
The deployment creates objects in three schemas of the application database:
DATA_PRODUCT_STUDIO_DB.MODELLINGholds the dimension and fact views (the dimensional model). This is what consumers query.DATA_PRODUCT_STUDIO_DB.STORAGEholds the storage tables that feed the dimensional views. Consumers don’t usually query these.DATA_PRODUCT_STUDIO_DB.PROCESSINGholds intermediate processing artefacts.
The dimensional views in MODELLING follow naming patterns:
DIM_<model_name>for dimension views.FACT_<model_name>for fact views.<model_name>for combined views in some cases.
Storage tables in STORAGE follow:
ATTR_<model_name>_<source_table>_<source_name>for loaded source data.EDGE_<model_name>_<related_model_name>for relationships.
What happens to changes after deployment
When you make further changes on the canvas and re-publish, the next deployment is incremental. The platform compares the new blueprint to the deployed state and applies only the differences. Re-deploying after a small change is fast.
If a change is structural (renaming a model, removing a business key), the platform may need to drop and recreate objects rather than altering them. The deployment summary tells you which when it runs.
Common mistakes and recovery
Deploying before the warehouse is sized appropriately
The studio’s DATA_STUDIO_WH is X-Small by default. That’s enough for typical small-volume deployments but can be slow with many models or large source tables.
How to recover. Cancel the deployment if it’s stuck. Ask an admin to scale up the warehouse:
ALTER WAREHOUSE DATA_STUDIO_WH SET WAREHOUSE_SIZE = 'SMALL';Re-run the deployment.
Deploying with a referenced data product not yet deployed
If your data product references models from another data product (read-only dependency), the referenced models must already exist in Snowflake. Deploying a data product that references undeployed models will fail because the platform can’t find the dependency target.
How to recover. Deploy the referenced data product first. Then deploy the dependent one.
Forgetting to grant the application access to lookup tables
Lookups join model fields to descriptor tables in source schemas. If the application doesn’t have SELECT access to a lookup table, the deployment fails when it tries to run the join.
How to recover. The deployment logs identify the missing object. Have a Snowflake admin run the grant. Re-deploy.
Re-publishing without re-deploying
Publishing produces a new blueprint. The deployed objects are still based on the previous blueprint. Until you re-deploy, downstream consumers see the previously deployed state.
How to recover. After publishing, re-deploy. The two actions are independent, but they need to happen together to make canvas changes visible.
Troubleshooting
Deployment fails at the Staging phase
Likely cause: the application database doesn’t have the schemas it needs, or the warehouse can’t run.
Resolution: confirm the install is complete and the application database is intact. Check the warehouse status in Snowsight.
Before contacting support: capture the deployment logs, the time of failure, and the warehouse status.
Deployment fails at Data Processing
Likely cause: a SQL error in an expression, a Table filter, a Delete Condition, or a lookup join.
Resolution: read the logs for the model name and the error. Open the model on the canvas, fix the SQL, save, re-publish, re-deploy.
Before contacting support: capture the model name, the failing expression or filter, and the error message from the logs.
Deployment succeeds but no data appears in the views
Likely cause: the source tables are empty, or the Table filter is excluding all rows, or the warehouse hit a quota.
Resolution: query the source table to confirm it has data. Test the Table filter as a WHERE clause in a worksheet. Check warehouse usage.
Before contacting support: capture an example row count from the source table, the Table filter value, and the data product’s deployment time.
Deployment took much longer than expected
Likely cause: large source tables, many models, large lookup tables, or a small warehouse.
Resolution: scale up DATA_STUDIO_WH for the deployment. After the deployment finishes, you can scale back down.
Before contacting support: capture the data product name, the warehouse size used, total deployment time, and the row counts of the largest source tables.
FAQs
Can I deploy individual models, or do I have to deploy the whole data product?
Deployment is at the data product level. The platform handles changes at model level (incremental updates), but you can’t trigger a deployment for one model in isolation.
What if I want to test a deployment without affecting production?
Use a separate Snowflake account or a separate application install for testing. Within one application, deployment writes to the application database; there’s no built-in dev/prod separation.
How often will the deployed views refresh with new data?
The platform creates Snowflake streams and tasks during deployment to keep the deployed views in sync with their source data. The refresh schedule depends on the source tables’ change frequency. The Govern and operate section covers operating a data product once it is live.
Can I drop deployed objects manually?
You can, but the platform will recreate them on the next deployment. To remove the data product’s objects permanently, delete the data product from the studio.
Will the deployment rebuild objects every time, or just update changes?
The first deployment creates everything from scratch. Subsequent deployments are incremental: only changed objects are altered or replaced. Structural changes (rename, key change) may force a rebuild for that object.
Related articles
- Prerequisite: Publish a data product
- Sibling: Add or reference a second data product
- Next step: Overview: semantic views in the studio
- Troubleshooting: Set up warehouses for the studio
Search keywords
deploy data product, model deployment summary, deployment logs, deployment outcome, snowflake objects, MODELLING schema, STORAGE schema, DIM, FACT, deployed, initial load, staging