Create your first data products with the Discovery Wizard
The Discovery Wizard turns a business process you already understand into a starting set of data products, entities, and a process map. This article walks you through one full run, from picking a process to having a structured set of data products in the studio ready to connect to source data.
Applies to: Data team lead Detail level: Guided
Who this is for
You’re a data team lead or a domain expert who knows a business process well, has access to the Data Product Studio, and wants to see what the platform proposes when you describe that process to it. You don’t need to have any source data connected yet. Source data comes later, after the wizard has produced its starting structure.
Before you start
You’ll need:
- The Data Product Studio installed and granted access. See Install from Snowflake Marketplace and Set up roles for the studio.
- A clear business process in mind, named at the right granularity. “Procure-to-Pay” works. “Procurement” alone is too broad. “Approving a single PO line” is too narrow.
- Five to ten minutes to think through what you want from the process: which business questions you need answered, and which physical artefacts (purchase orders, invoices, contracts, work orders) it produces. The wizard works best when you can describe these clearly.
You should have already read:
The Discovery Wizard at a glance
The wizard runs in three steps:
- Domain and process definition. You tell the platform what business context you’re working in.
- Entity models, data products, process visualisation, and catalog example. The platform proposes a structure. You review it.
- Pivot to data products and apply governance. The platform groups entities into governed data products and you save.
A run takes ten to fifteen minutes the first time. The platform calls Cortex during steps 2 and 3, so each transition has a short wait while it works.
The Exit Wizard button in the top right discards your work. There’s no draft state. Plan to finish the run in one sitting.
Step 1: Define your domain, process, and context
Open the studio and go to Studio > Data Products. The page lists every data product the studio has produced so far. On a fresh install, the list is empty.
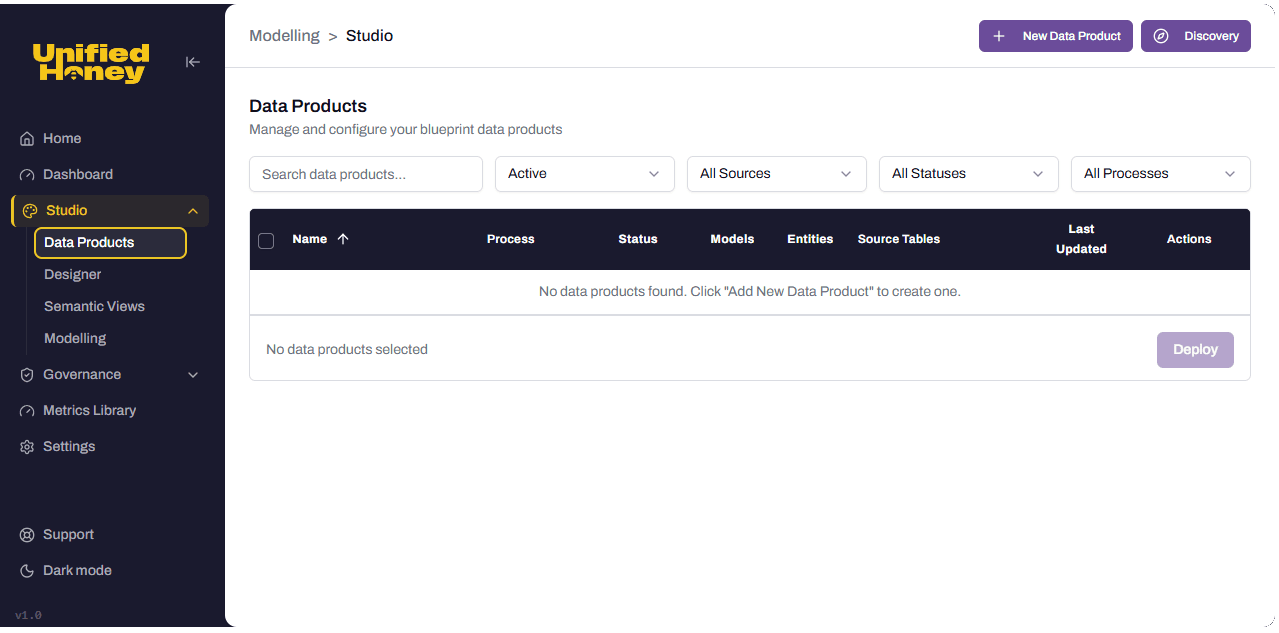
Click Discovery in the top right. The wizard opens at Step 1.
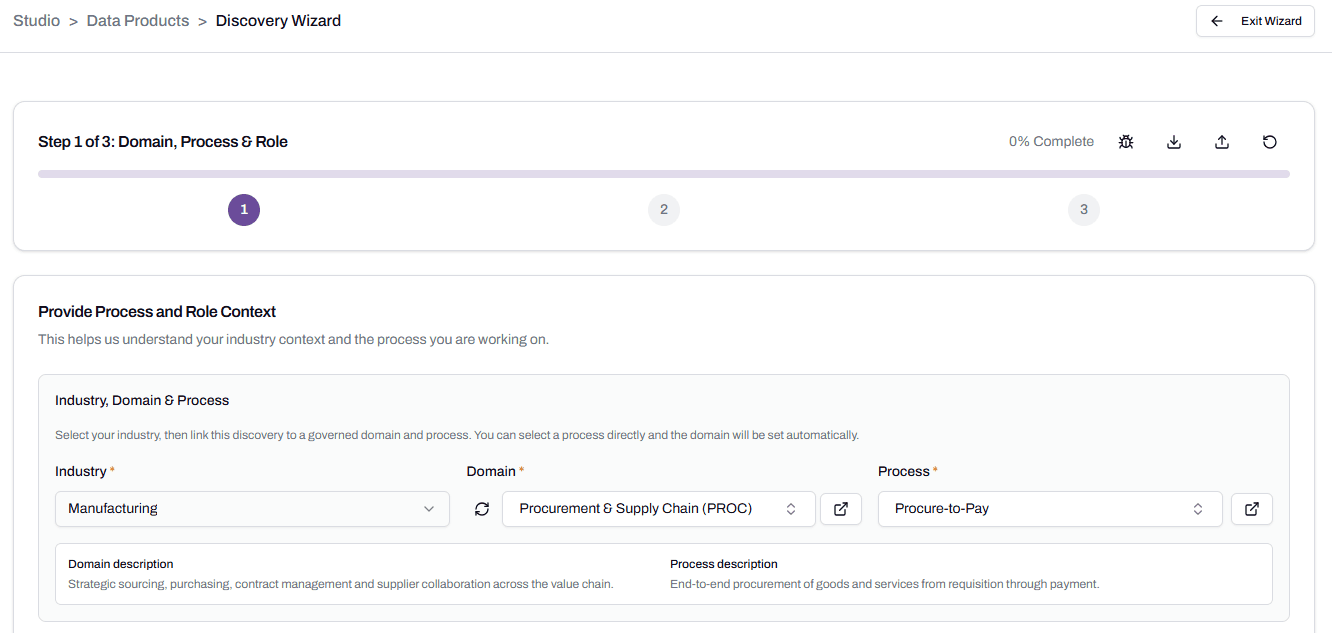
Pick Industry, Domain, and Process
Start at Industry. Pick the industry your business operates in. The choice gives Cortex broader context and influences the language it uses later.
Then pick a Domain. The Domain list filters to the chosen Industry. Selecting a Domain reveals its child processes in the Process dropdown.
Pick a Process. The platform shows the Domain and Process descriptions below your selection. If the description doesn’t match what you mean by that process name, your wizard run is going to drift. Stop and pick a different process, or click the icon next to the Domain or Process field to open the management screen and add your own.
Set Functional Area
Functional Area is required and intentionally separate from Domain. The same domain can be approached from different angles. Operations needing procurement data wants different entities than Compliance auditing procurement spend. Set the area you’re working from.
The optional Sub-area field narrows it further (for example, “Strategic Sourcing” or “Accounts Payable”) if your team focuses on a slice of the area.
Describe what you need
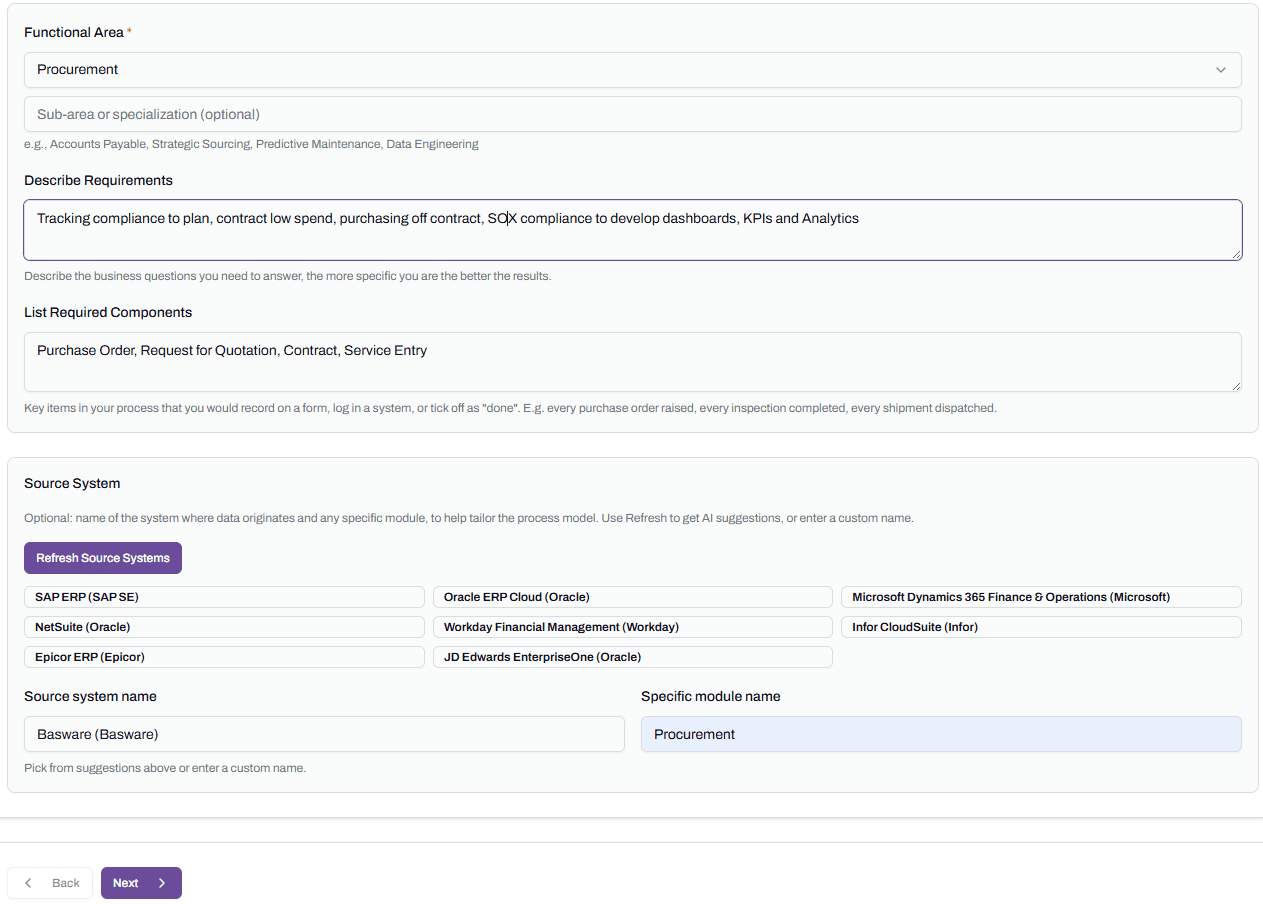
Describe Requirements is a free-text box. Write what you actually need this data to answer. Cortex uses this to shape the entities and data products it proposes. Detailed input produces better output. Sparse input produces generic output.
A good answer names the business questions (“tracking compliance to plan, contract leakage, off-contract spend, SOX reporting”) rather than abstract goals (“improve procurement”). Three or four specific questions is enough.
List Required Components is a comma-separated list of artefacts the process must include. Examples: “Purchase Order, Request for Quotation, Contract, Service Entry”. The platform treats these as must-haves and ensures they appear as entities in step 2.
Add the source system
The Source System section is optional. You can type a system name directly into the Source system name field, or click Refresh Source Systems to ask Cortex for suggestions based on the context you’ve already entered. The suggestions vary with industry and process.
It’s worth filling in. If Cortex knows you’re working with SAP, it’ll use SAP’s terminology. If it knows you’re on Pronto Xi, the same business object might be named “Work Request” rather than “Notification”. Naming alignment now saves rework later.
The Specific module name field narrows the system further (for example, “Procurement” within Basware) when the source system has clear modules.
Click Next when the page is filled out.
Step 2: Review entities and the process
The platform calls Cortex to analyse what you’ve described. Step 2 takes thirty seconds to a minute to load.
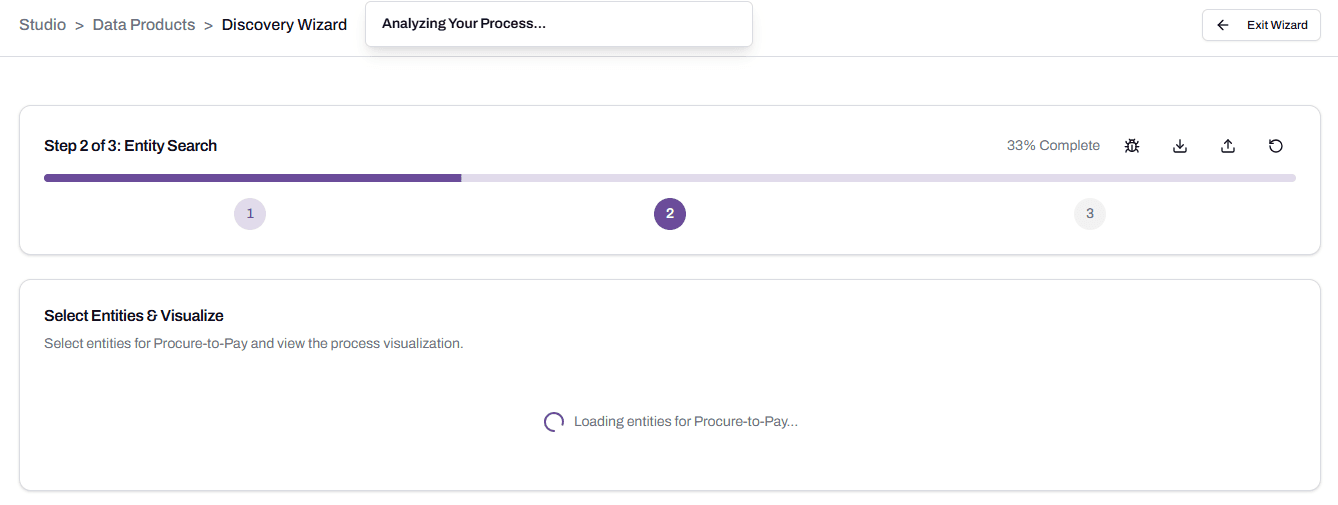
When loading finishes, Step 2 shows two tabs: Entities and Process Visualization.
Review the entities
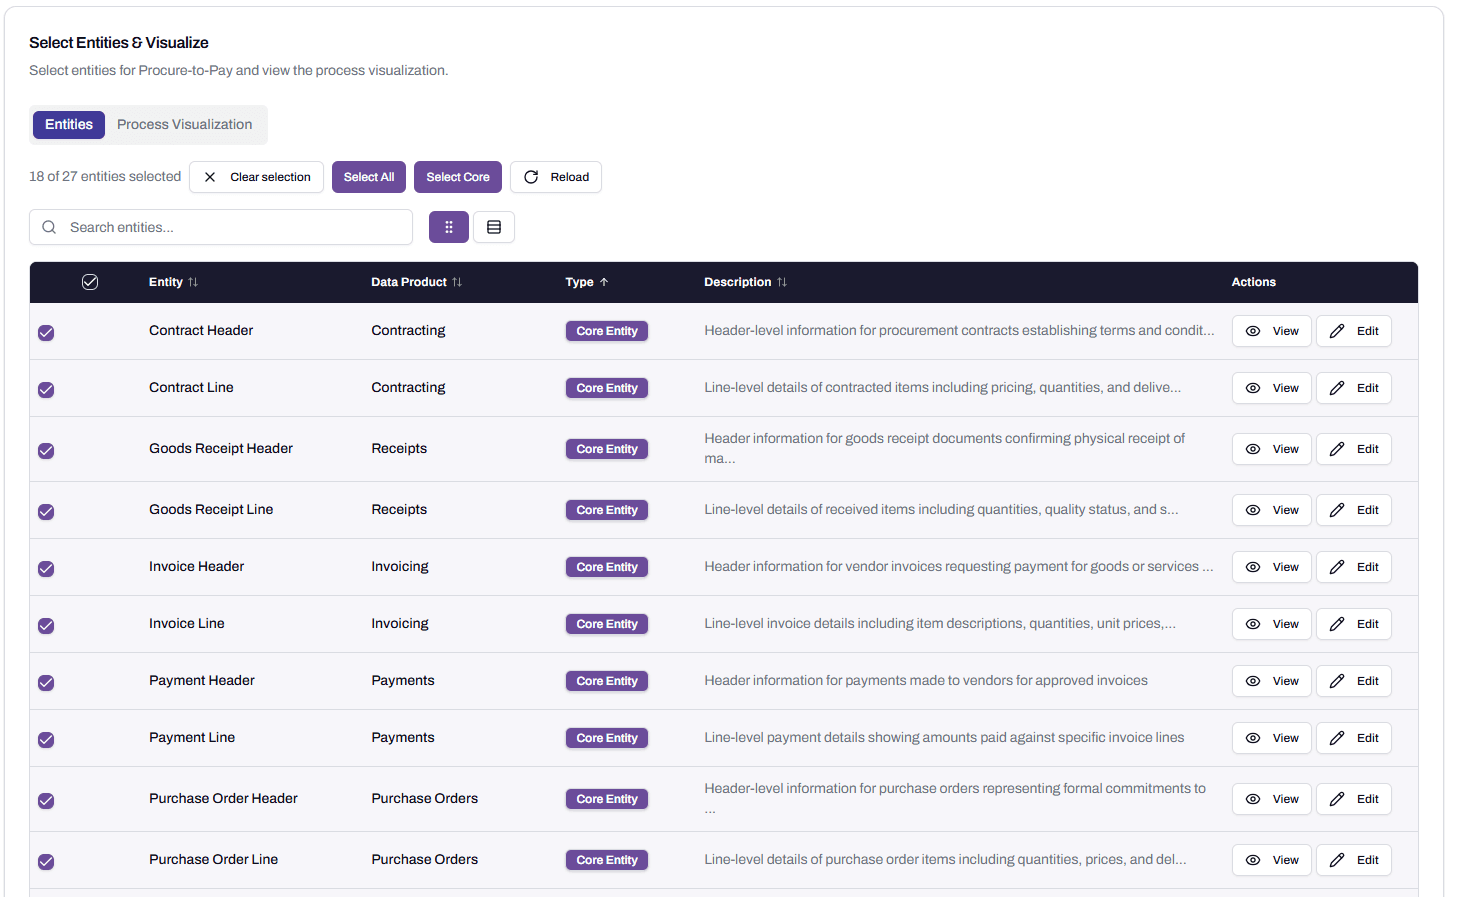
The platform proposes a list of entities for the process. The number varies with what you described in Step 1. The example above shows 27 entities for Procure-to-Pay, with 18 selected by default.
Three buttons control selection:
- Select All picks every entity. Recommended for your first run. You can always remove entities later.
- Select Core picks the transactional entities only. Useful if you want a minimal starting point.
- Clear selection removes all selections.
Each entity is tagged with a Type:
- Core Entity: a transactional object that’s central to the process, like Purchase Order Header or Invoice Line.
- Supporting Entity: reference or master data that the core entities depend on, like Cost Center, Vendor, or Employee.
Use Search entities to filter the list when there are more entities than fits the screen.
View an entity’s catalog detail
Click View next to any entity to open its catalog detail. The detail shows a description of what the entity represents, where it sits in the process, and a typical field list with data types.
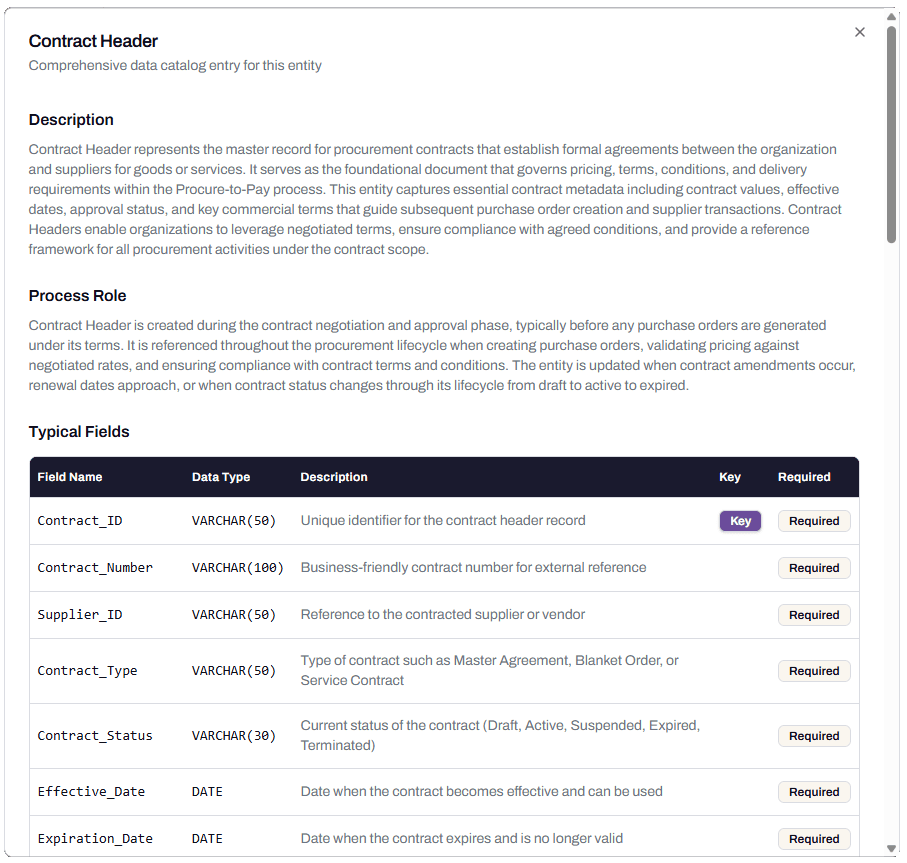
The catalog detail is read-only. It’s there to help you decide whether the entity belongs in your selection.
Edit an entity to change its data product
Click Edit to change an entity’s settings. The Edit Entity dialog lets you change the entity’s Data product, Entity type, and Business keys.
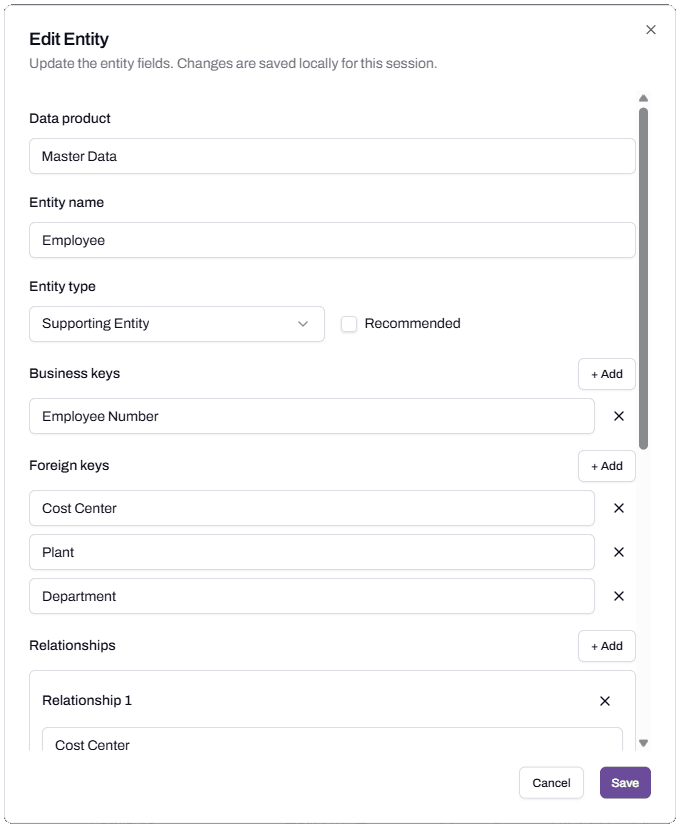
This is the most important editing decision in the wizard, and it connects to governance in Step 3. Here’s why.
By default, the platform groups all reference and master data entities into a single data product called Master Data. Cost Center, Vendor, Employee, Material, Plant all land there. That works for most reference data, but it has one consequence: the Master Data data product can’t get a single security or privacy rating, because the mix is too varied. Cost Center is internal; Employee is PII; Material can be confidential. They can’t share one rating.
If an entity has distinct governance needs, edit it and move it into its own data product. The example above shows Employee being changed from Master Data to a new data product called Employee, which can then carry its own Confidential and PII rating in Step 3.
You don’t have to do this for every entity. Do it for the ones whose governance materially differs from the default reference-data baseline.
See the process visualisation
Switch to the Process Visualization tab. The platform generates a flow diagram of the process, with the entities you’ve selected positioned along the path.
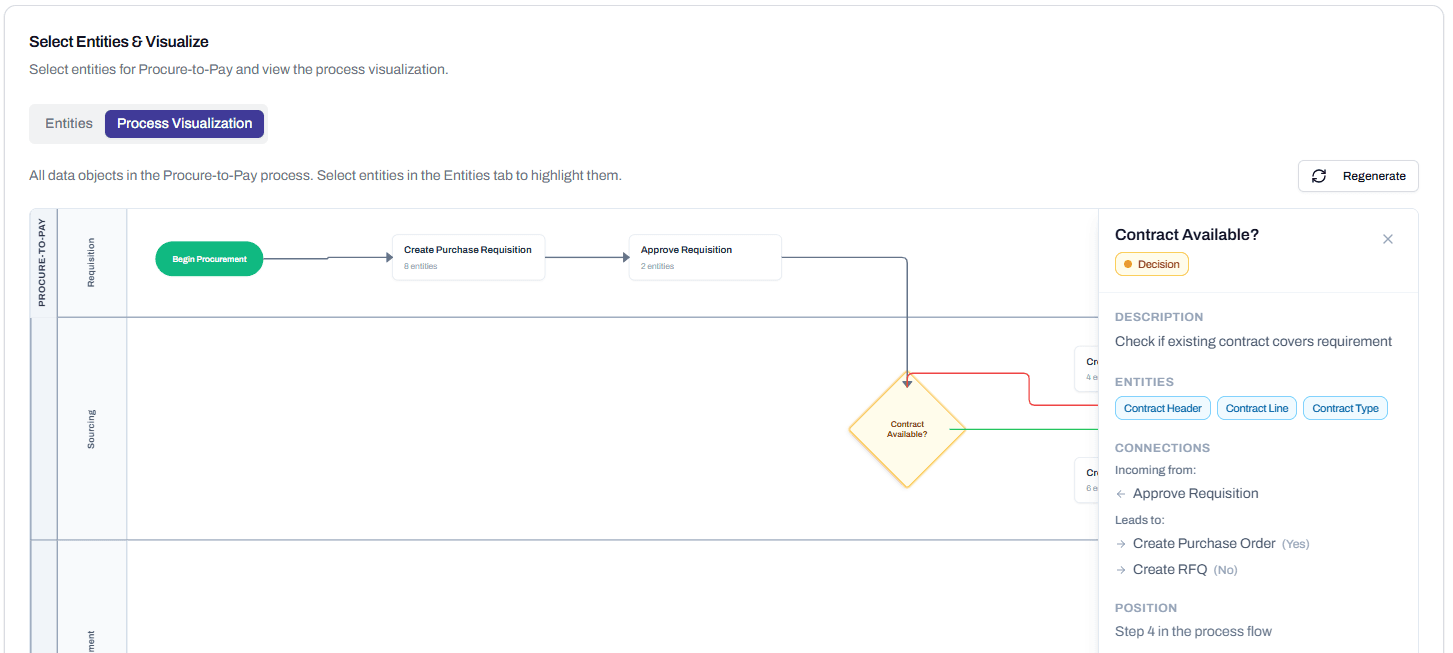
Click any node in the diagram to open its detail panel. The panel shows the node’s description, the entities it touches, the nodes it connects to, and its position in the flow.
If the visualisation doesn’t match how you actually run the process, click Regenerate to ask Cortex for another pass. Regeneration uses the same context from Step 1, so if the diagram is consistently wrong, the issue is usually in the Step 1 description rather than the diagram itself.
When you’re satisfied with the entity selection and the process map, click Next.
Step 3: Apply governance and save
Step 3 pivots from entity models to data products. The platform groups your selected entities into data products and asks Cortex to suggest Security, Privacy, and Description values for each.
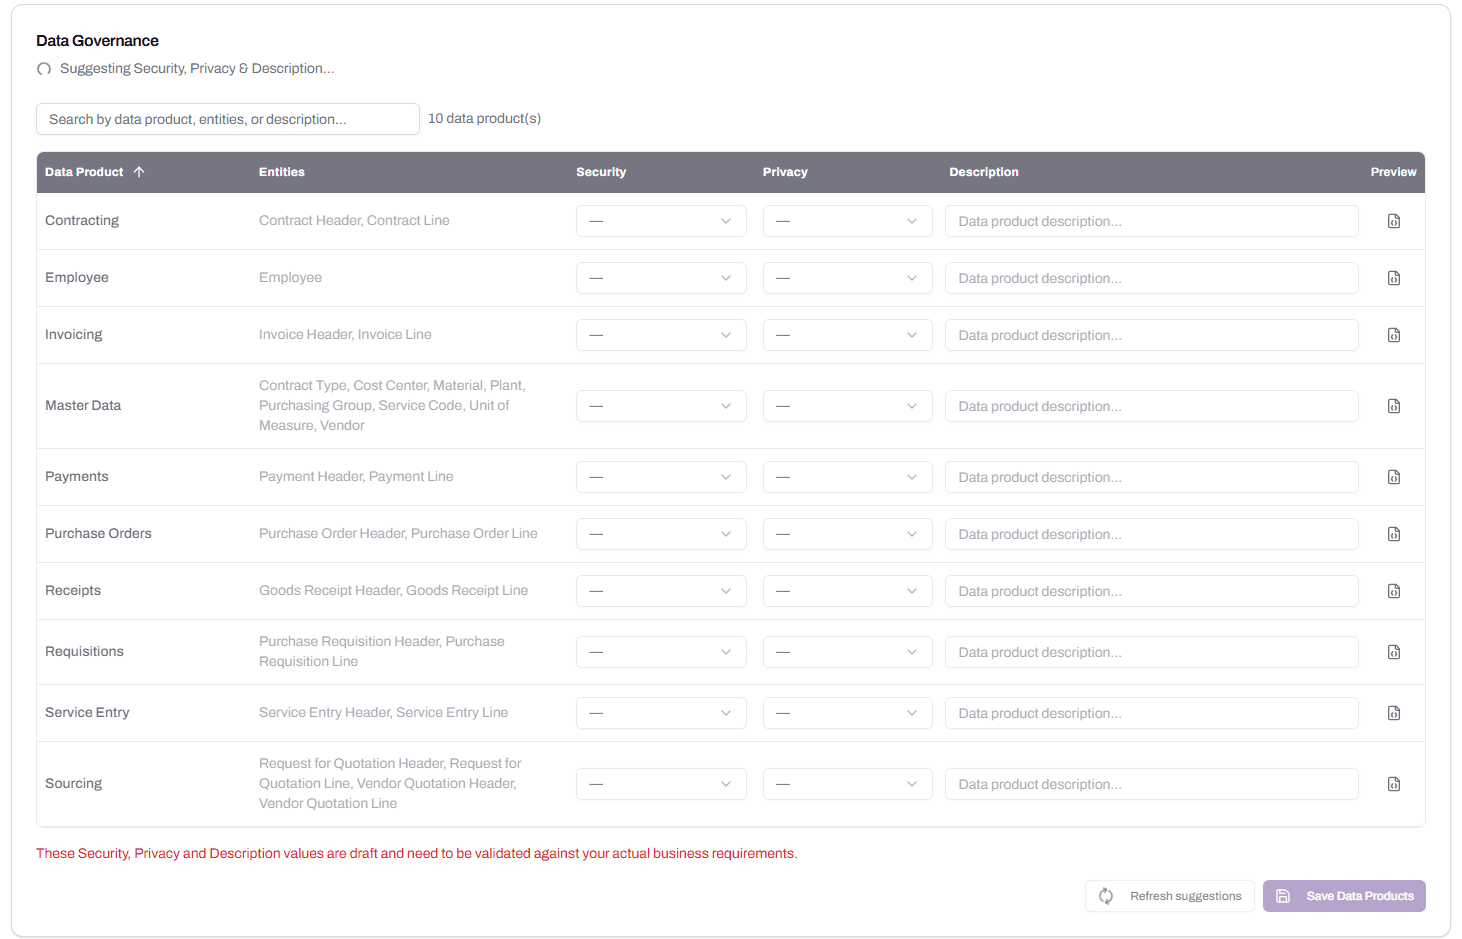
When the suggestions finish loading, the table fills out.
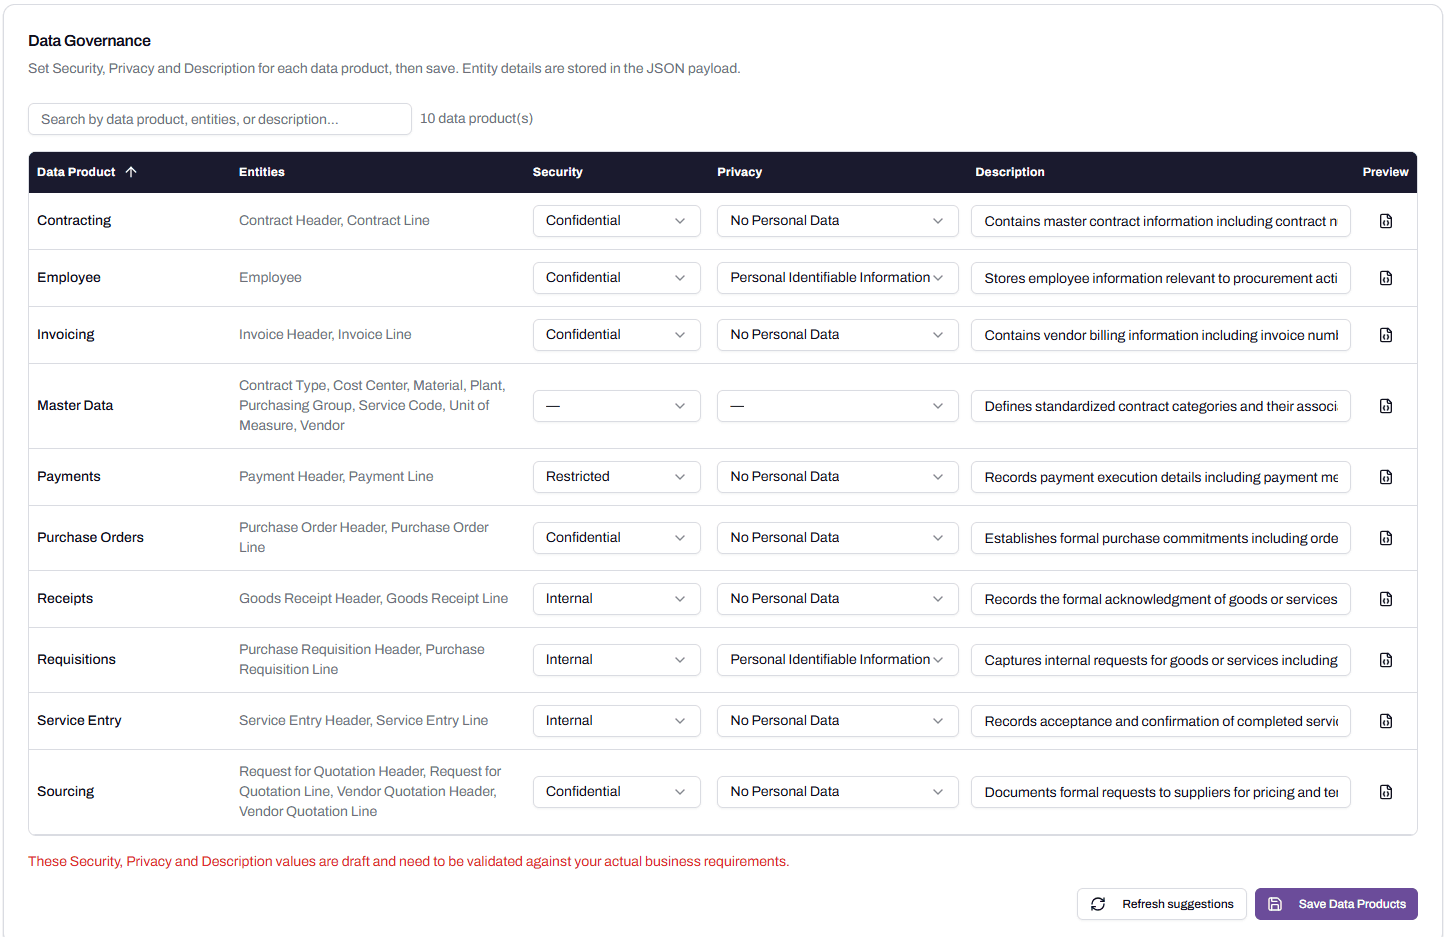
Review the suggested values
Read each row. Three things to look for:
- The data product name. Cortex generates names from your Step 1 inputs. Most are sensible. If a name is misleading for your business, change it now.
- Security and Privacy ratings. The available values are configurable in the studio’s Settings, so what you see depends on what your account has loaded. Adjust each row to match your organisation’s policy.
- Description. Cortex drafts these. Read each one. They’re usually accurate but read like AI prose rather than your team’s language.
Master Data is the exception. Its Security and Privacy fields stay as dashes because, as covered in Step 2, the mix of data is too varied for one rating. If you have entities in Master Data that need specific governance, the place to address that was Step 2 (Edit Entity, move to a new data product). If you missed that and want to fix it, click Back to return to Step 2.
The Refresh suggestions button at the bottom asks Cortex for another pass. It overwrites everything, including any manual edits you’ve made. Use it when the first pass is consistently wrong, not when you’ve made good edits and want a few cells refreshed.
Click Save Data Products
When the table is correct, click Save Data Products. The platform creates the data product structures, models, business keys, and relationships, then exits the wizard.
What you’ve got now
The Data Products page now shows your saved data products.
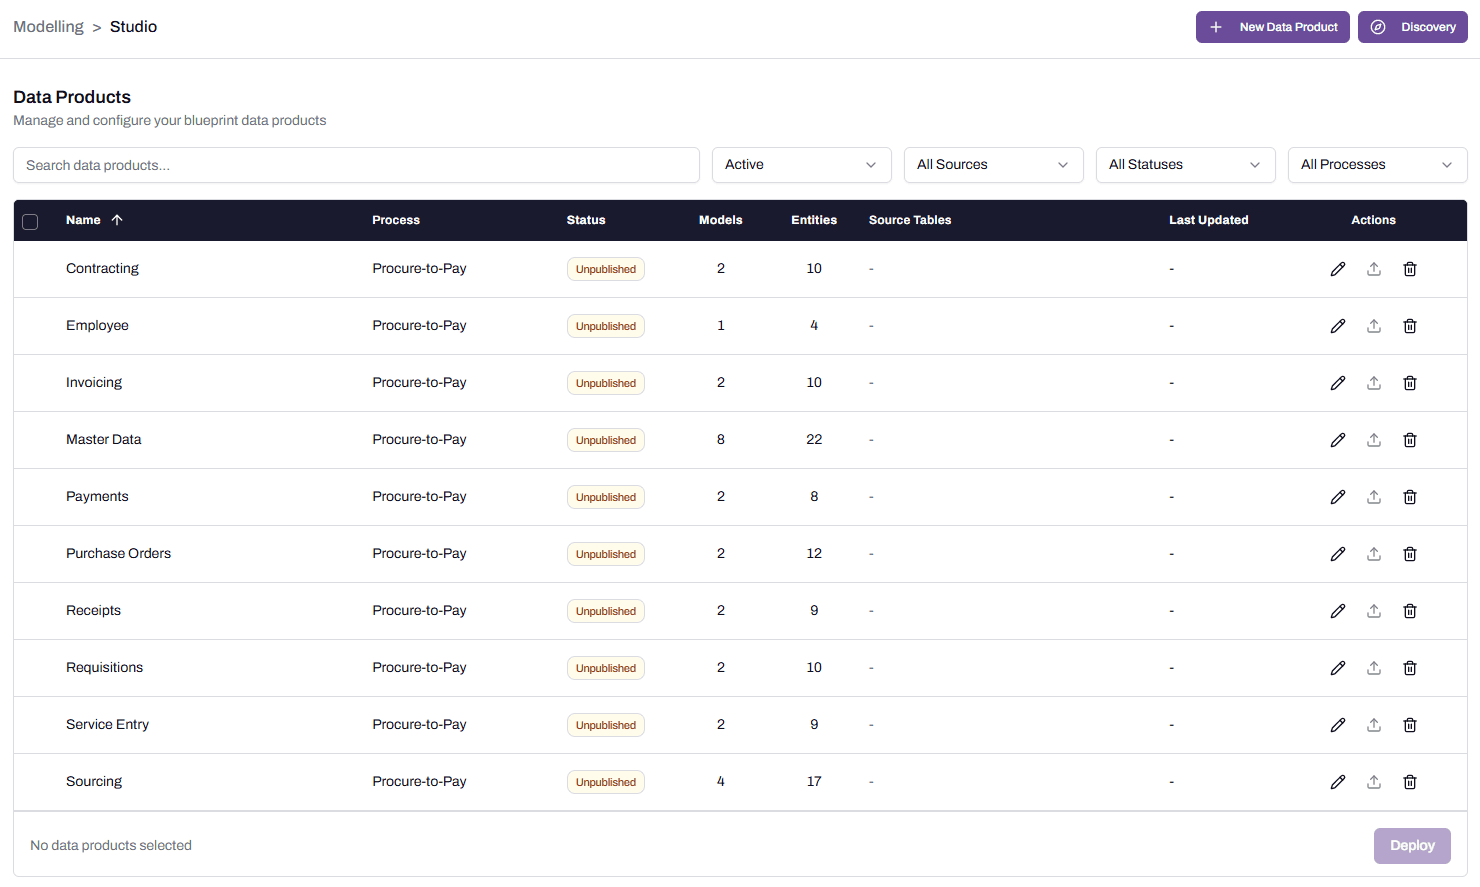
Each row shows the data product name, the process it came from, its status, and counts of models and entities. Status is Unpublished. That’s the state where the data product exists as a blueprint but isn’t yet connected to source data and isn’t yet deployed.
Three things are still missing:
- Source data. The data products know what shape they should be, but no actual data is mapped to them. That happens in the visual designer.
- Metrics and semantic views. Generated after source data is connected.
- Deployment. The Deploy button stays disabled until at least one data product has source data and a generated semantic view.
The next step is the Designer. See Connect a source table to a model.
Common mistakes and recovery
Mistake: picking too broad a process
If you pick “Procurement” rather than “Procure-to-Pay”, the platform tries to model the whole domain at once. The entity list comes back too long and the process diagram is too generic to be useful.
How to recover: Exit the wizard and start again with a narrower process. The platform handles narrow processes well. You can run the wizard multiple times for different sub-processes within the same domain.
Mistake: leaving Describe Requirements vague
If your requirements text reads like “we want better procurement reporting”, Cortex has nothing specific to ground its output on. The entity list comes back generic.
How to recover: Exit the wizard and start again with three or four specific business questions you need to answer. Each question gives Cortex something to anchor the output against.
Mistake: deselecting entities you turn out to need
You might deselect entities at Step 2 that look unnecessary, then discover at Step 3 (or later, in the Designer) that they’re needed.
How to recover: Click Back from Step 3 to return to Step 2 and re-select. If you’ve already saved, run the wizard again for the same process. The new entities can be added to the existing data products in a future workflow.
Mistake: clicking Refresh suggestions after editing
You spend ten minutes adjusting governance values, then click Refresh suggestions to see what else Cortex might propose. It overwrites every edit.
How to recover: Edit each row again. There’s no undo. The Designer’s overview covers patterns for getting governance right the first time.
Mistake: clicking Exit Wizard mid-run
The Exit Wizard button discards your work. There’s no draft state.
How to recover: Run the wizard again. Step 1 is quicker the second time because you know what each field does.
Troubleshooting
The entity list is empty or much smaller than expected
Likely cause: the platform couldn’t ground your Step 1 inputs in any known process pattern. Common when the Industry, Domain, or Process is custom and brand new, or when Describe Requirements was very brief.
Resolution: Go back to Step 1. Confirm the Industry, Domain, and Process descriptions match what you mean. Expand Describe Requirements with three or four specific questions. Add a Source System if you skipped it. Click Next again.
Before contacting support: capture the Step 1 form values, the entity count, and a screenshot of the Step 2 result.
Process visualisation shows a generic flow that doesn’t match your business
Likely cause: Cortex has fallen back to a textbook version of the process because your Step 1 description didn’t include the variations you actually run.
Resolution: Click Regenerate once. If the second pass is still generic, the fix is in Step 1 rather than the diagram. Click Back to Step 1, expand Describe Requirements with the variations specific to your business, and re-run.
Before contacting support: capture the Step 1 form values and a screenshot of the visualisation.
FAQs
Can I run the wizard more than once for the same process?
Yes. Each run produces a fresh set of data products. The new run doesn’t overwrite or merge with previous results. You can keep, edit, or delete the older data products from the Data Products page.
What if my industry, domain, or process isn’t on the list?
Each of those fields has an icon next to it that opens its management screen. Add the missing item there, then return to the wizard. Custom domains and processes work the same way as built-in ones, but they have less Cortex training behind them, so detailed Describe Requirements text matters more.
Can I rename data products after the wizard finishes?
Yes. From the Data Products page, click the edit icon on any row to rename the data product, change its description, or adjust its governance values.
Does running the wizard cost anything?
The wizard uses your account’s Cortex compute and the studio’s warehouse. Both are billed by Snowflake against your account. A typical run is small, but if you’re running the wizard repeatedly, it’s worth keeping an eye on warehouse and Cortex usage in Snowsight.
Related articles
- Prerequisite: Set up warehouses for the studio
- Sibling: Connect source data in the visual designer
- Next step: Connect source data in the visual designer
- Troubleshooting: Resolve generation failures in the studio
Search keywords
discovery wizard, run discovery, first data product, generate entities, generate data products, process visualisation, entity types, core entity, supporting entity, master data, edit entity, data governance, security privacy description, save data products, unpublished data product